One of the most exciting features of the new HP Z3100 series printers is the built-in capability to make profiles. This is made possible by the inclusion of an actual spectrophotometer in the printer head assembly. This spectro photometer also serves double duty for the linearization process that HP uses to “calibrate” the printer.
Epson and HP both strive to make their printers accurate and repeatable. Epson has done this by using special ized hardware and software that operate in the background. Even way back with the 7600/9600 printers, this provided amazing consistency over time, and from printer to printer. Because of this, each 9600 printer basi cally prints identically to each other. This is why Bill Atkinson could let other 7600/9600 owners use his special profiles. I have seen this in practice, printing the same reference target on various 9600s, and they are amazingly alike. This is also true with the 7800/9800 printers. With their newest 7880/9880/11880 printers, Epson claims even greater consistency from printer to printer of about 1 “delta-E” (a very small, basically imperceptible differ ence).
HP has taken another route, and has built-in various colorimiters in their printers to read a series of patches that are printed out, and then measured. This creates an underlying linearization “curve” for the printer. This pro cess is similar to the very first step that monitor calibrators perform (before making the actual monitor pro file). Monitor calibrators will display patches of various colors and densities to create an optimized curve to be used in the video card LUT. This curve helps set the monitor to an agreed-upon standard (such as gamma 2.2). Only then is the profile made, based upon this curve in the video card. This reduces the amount of work that the profile needs to do. Profiles can do an amazing amount of correction for poorly linearized output (like Bill Atkinson’s Epson 9600 profiles), but this can lead to posterization and banding. It is much better to start off with nicely linearized output, and then build the profile on top of that.
Since the Z3100 uses a spectrophotometer, this underlying printer linearization can be even more accurate. With the printer in this agreed-upon state, a profile is then created. You can redo this linearization without having to redo the profile. And this linearization (HP calls it “color calibration”) should be done regularly to insure con sistency.
________________________________________________________________
Making Profiles—without the Z3100
If you want to start making your own profiles, you’ll need some specialized equipment and software. The prima ry requirement is a way to accurately measure the printed patches in a profiling target. Some earlier inexpensive “solutions” involved using your home flatbed scanner to make the measurements. This is not good! I remember someone telling me he “wasted a year of his life” trying to get this to work. You need a real spectrophotometer to get accurate and repeatable readings. And the just-announced X-rite “ColorMunki”, at around $500, is a real price breakthrough. Initial reports are very promising on this device’s ability to make good profiles, even though it uses only 100 patches to create the profile. Previously, one of the least expensive spectrophotometers was the Xrite “Eye-One”, ($1300) which also included the software that creates the profile from your measurement data. This hand-held device comes with a ruler that is placed over a row of patches. Each patch is sufficiently differ ent from each other that one pass of the device can read a whole row of patches. The software will warn you if the patches are not what it expected, and ask you to read a row again. But, I still find that bad readings can occur, and just one seriously wrong patch will really screw up the resulting profile. Reading a target of around 900 patches with the ruler can take ten minutes or more. To insure accuracy, I print two targets, read them both and then compare the results. With “ColorThink” software ($129 fromwww.chromix.com), you can graph the results in 3D, which will allow you to easily see if there are any “outliers”. (In the process of reading the targets with the ruler, they will get scuffed up, so instead of reading the same target twice, better to print two). This is kind of a pain!
To automate patch reading with the Eye-One, you can now buy the “iO”. For around $1600 extra you get this robotic arm that will move the spectrophotometer around to read all the patches. It’s quite entertaining—except my sources tell me, it is not repeatable. Reading the same chart twice can give errors up to 7 delta-E, which is not acceptable. (At least it does not scuff the patches!). You could, instead, get the Xrite “Isis” automated spectro photometer for around $3400—superb. But, it doesn’t include the profile making software…
The cheapest, most repeatable automated spectrophotometer I know of—is the HP Z3100 printer! And it in cludes the software to make profiles—and, oh yeah, it can make pretty good prints, too. All this for around $4,000 for the 24” model. The standard profiling target it creates has approximately 460 color patches. Some color management gurus consider this a little small. Bill Atkinson has experimented using many thousands of patches (which were necessary for the Epson 9600’s twisted output), but now routinely uses 1728 patches (a 12x12x12 grid).
________________________________________________________________
HP Advanced Profiling Solution
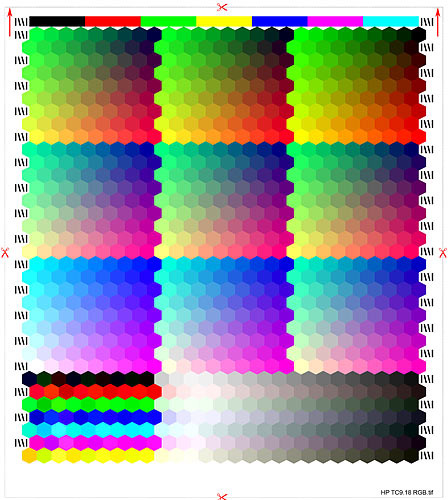
For another $800, you can get the HP “APS” which will allow creation and measurement of targets of up to 918 patches, using a profiling target designed by Bill Atkinson (illustrated below). It consists of a 9x9x9 grid of equal ly spaced RGB values, plus extra patches near the neutral tones, and extra patches near the saturated extremes. It can provide an excellent profile on today’s fairly linearized printers. Usually, the more linear the raw output of the printer, the fewer patches are needed. The APS is rather sophisticated in that it can create targets on the fly, depending on what size paper you have loaded. On roll paper, it can create long and narrow targets. On smaller sized sheet paper it will, if necessary, use more than one sheet to fit in all the patches. The APS requires a wait of five minutes before reading any patches, so that the ink densities will stabilize. When reading targets split over two sheets, it will guide you when to insert each sheet.
However, I think the main advantage of the “APS”, is that it lets you use the Z3100 to also make profiles for other printers. If you have more than one printer (or friends with printers), your investment in the Z3100 and APS will now really pay dividends. HP doesn’t really document this, but they’ve included options that make it possible. They even include the 918 patch profiling target (hidden away in the APS software). So, just print this target out on your Epson 3800, and then tell the HP APS to read the target. Oops! This supplied target is 18×20 inches, and won’t fit most desktop printers. The target cannot be downsized, since each patch has to be a partic ular size. Would anyone be crazy enough to manually reconfigure this target to fit on two pieces of 13×19 paper? The answer is yes! (to the reconfiguring part). What I am providing with this article are the same 918 patches, in the correct order, sized to fit and split over two sheets of 13 x 19 paper. This will allow you to print this target on almost any printer. And then use the Z3100 to read the target, and create a profile for that other printer.
First, if you will be using roll paper, you can use the already supplied 18×20 inch HP target with 918 patches. It’s hidden away in the APS application. Follow this route in the APS folder: References : Printer : DJ_Zx100, and the tiff is named “HP TC9.18 RGB.tif”. This has some little scissor marks indicating where to cut it after print ing—but don’t trim the right side!
The Z3100 will get confused when reading the target trimmed as indicated. I found leaving 5-6 inches on the right side results in a successful reading.
To download the targets for 13×19 paper, see the end of this article . I have placed these 13×19 targets on a 13×19 canvas, so when you select 13×19 sheet size, Photoshop will complain that the “image area is larger than the printable area”, but just ignore this and print (that’s just white around the edges). Do not downsize these targets.
When printing any profiling target, you must remember several important things. You want to send the raw num bers in these targets to the printer, without any type of color management getting in the way and limiting the col ors or densities . So, the target file should be “untagged”, which means there is no embedded profile. Secondly, when printing these targets, in the first Photoshop dialog box, instead of “Photoshop manages colors”, choose “no color management”. And in the second dialog box (the one specific to your printer), disable any color manage ment. (For Epson, under “Printer Color Management”, choose “off”. For HP, if you print these targets di rectly out of the HP APS, then it sets everything correctly for you. If you’re using another HP printer, then under “Color Options”, choose “Application Managed Colors” (since Photoshop is set to “no color management”)).
After printing, I then load the target(s) into the Z3100, just like loading some blank printing paper. Insert the top end with the long color bars first. As usual, the printer will ask you what paper you’re using, even though it doesn’t make any difference for this reading of the target. You do need to choose a paper that has been “cali brated”, or it won’t read the target. In a move seemingly calculated to discourage us, the APS will now make you wait five minutes (for ink drying). If you’re using the 13×19 targets, it will make you wait 5 minutes for each sheet!! (Have pity on us, HP!) After loading the paper, navigate in the APS software to “I already printed a test target”, and choose the 918 patch option.

It doesn’t matter about the print layout or gloss enhancer—I leave those at the default position. It will now ask you to load the paper—but just click the “Done” button. (This interface could use some work! Even after select ing something, you still have to click the orange button at the bottom to go to the next step…) The APS should now start measuring your test target (after the 5 minute meditation). If you’re using the two 13×19 sheets, it will first say it’s measuring page 1 of 2. When the APS says the first page is done, remove it and insert the 2nd page, ignoring the messages on the printer’s LCD. (That LCD will say scary things like “getting ready to print”…) It will soon start reading that page, too.
After the reading is finished, you’ll see this screen.
 You’ll need to name the profile, and after naming—be sure to click “Save Measurement Data”, which will save the measurements in a text file in the APS folder. I usually just save the profile to the system, and I don’t like any of the “expert options”. Click the orange arrow again, and your profile will be created. The APS is smart enough to save the profile in the proper system folder for you.
If you encounter problems with the APS rejecting the target, it’s probably due to differences in the margins. The target should be about 1/2 inch from the top and left sides of the page, so you might need to trim your print to achieve this.
I find this much more fun than dragging a spectrophotometer across colored patches by hand, and this gives very repeatable results. (In reading the same target twice, I typically get a Delta-E of 1 or less).
________________________________________________________________
Customizing the APS
.
One of the most important variables in profiling a new paper is choosing the appropriate media setting. For wa tercolor-type papers on the Epson, will the “Watercolor Radiant White”, or the “Velvet Fine Art” give the black est black with this new paper? On the HP, does “Smooth Fine Art” or “Smooth Fine Art <250” give the best result? Now that you’ve got this automated spectrophotometer, you can easily test to find out! I have included a custom target of 100 patches for this purpose. Let me explain…
The APS comes with a choice of three targets, with either 45, 288, or 918 patches. (The default profiling target (non-APS) is 465 patches—so I find it curious that by paying more, you get the option to use fewer patches!? I would stick to the 918 patch target for color profiling). However, it is possible to “fool” your APS, and create your own test targets. In the “References” folder of the APS, in the “Printer” folder, you’ll find text files that contain the description of each patch in the targets, using RGB numbers. The targets that the APS prints out are created from these files, and by changing just this text file, you can create and then read your own custom targets on the HP.
I have included a text file for a custom target ( 100 patches) that I made up for the purpose of testing printer dMax (how black is the darkest black), linearity and color saturation. (You don’t want to use this to create an actual profile). It has 86 patches that go from pure black (0,0,0) to pure white (255,255,255) in steps of three RGB units. And it has the most saturated primaries and secondaries, and some patches of lesser saturation. By just examin ing the resulting measurement file from this target, you can determine several important things:
-
How black is the maximum black this media setting gives on this paper?
- How is the spacing on these dark tones? Are they crushed together, indicating too much ink is being used?
- How do the saturated colors compare to other media settings? Is this media setting reducing the available color gamut?
There’s one catch, though… The readings that the HP APS saves in its text files are spectral measurements—truly excellent—but undecipherable by humans. Since we haven’t spent any money in the last few paragraphs, I’m again recommending you get ColorThink (www.chromix.com). The latest version can now read spectral files. (ColorThink is an excellent program for examining and comparing color profiles—it can dramatically improve your understanding of color by showing things in 3D). ColorThink will allow you to translate those spectral measurements into LAB numbers. LAB is a special color space that separates out the colors from the luminos ity, where the L values are basically the tonality. So, for the maximum black, just examine the L number for the RGB patch of 0,0,0 to see how black the black is.
This 100 patch text file I’m supplying is given exactly the same name as the (fairly useless) 45 patch “HP easy RGB 1.2.txt” target. You’ll find this original .txt file in the “References” folder, inside the “Printer” folder, inside the folder named “DJ_Zx100”.
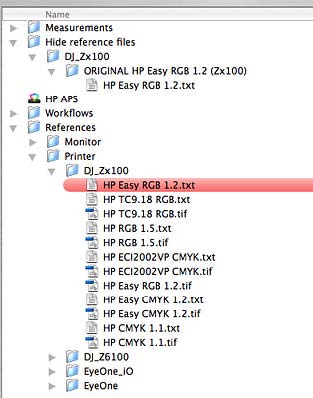
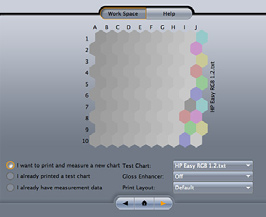
Notice that I have added a new folder “Hide reference files” where I’ve stashed the HP original. Since these text files have the same name , you’ll need to be careful to not lose the original! By giving our custom target the same name as the HP supplied target, we’re “fooling” the APS to use our target. Now, when you select the “HP easy RGB 1.2.txt” in the APS, you’ll see this target instead:
These 100 patches easily fit on a 11×17 paper. (I don’t recommend using 8.5 x 11 cut paper with the Z3100 due to jamming issues!) What I usually do to test a media setting is first run the "color calibration" (the linearization) on 11×17 paper. When that is finished, turn the page 180 degrees, and there’s enough room for this 100 patch test target.
If you want to use this 100 patch target on other printers, I have also supplied a tiff file for that. (To have the APS read this target properly, you will still need to switch out the reference file as described above. See the end of this article for downloading both). Again, the margin your printer adds may be a little different, and if the APS rejects the target, try trimming the top and left sides to about 1/2 inch from the target. After the APS reads all the patches, be sure to only click the “Save Measurement Data” button. And then quit the APS. Do not make a profile from this target (it will let you–and not complain—but it will be a bad profile). With this test target, you’re just saving measurement files to examine in ColorThink.
Using the 100 Patch Target
Below is a comparison of two media settings for the Z3100, with the measurement files displayed in ColorThink Pro. The “Pro” version can compute a Delta-E column (on the far right) that shows the differences between the two sets of readings. In the far right column, Green means a Delta-E of less than 3, yellow = Delta-E of 3 – 6, etc. The lower the Delta-E, the closer the two measurements are to each other.
The paper I’m testing is one of my favorites, Ilford Smooth Pearl. I’m comparing two media settings: “Photo Semi-Gloss/Satin Paper (more ink)” on the left, and “Photo Semi-Gloss/Satin Paper (less ink)” on the right. Here’s a detail showing the darkest tones.
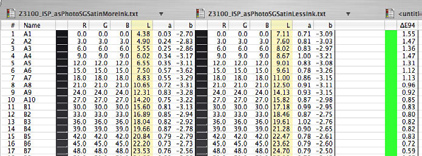
Notice that the “more ink” setting does give a slightly blacker black (I’ve highlighted the L columns in light yellow). (The lower the L value, the darker the patch). You can see in the far right column (the “delta E”), that this difference reduces to insignificance as things lighten up. Below is a closeup of the part of the chart with the saturated colors.
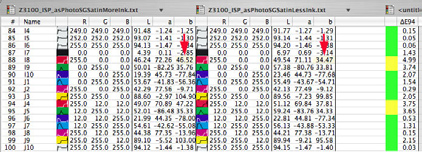
Here’s where we see greater differences. The far right column now shows some rows in yellow, indicating a dif ference between 3 -6 Delta-E units. In LAB, the “a” (magenta-green) and “b” (yellow-blue) channels control the colors. The bigger the number (positive or negative), the more saturated the colors. I’ve put red arrows in the “b” columns, showing that the “less ink” setting has reduced the intensity of the yellow component in the red patch.
HP tells me that this is normal. They say that "Briefly, the linearization (calibration) process controls primary ink densities only (each ink individually), and since the primary densities are already pretty much ‘maxed out’ for the standard preset, they do not change for the ‘more ink’ version. What does change, however, is the amount of ink used for secondaries, i.e. combinations of more than one ink.
It’s really in the color rendering of saturated colors that we see a difference (almost 5 Delta-E), and the benefit that laying down more ink can give. Is there a downside to using this “more ink” setting? I have noticed that certain tonalities do show more “graininess” (more noticeable dot pattern). The HP engineers I spoke to called this “coalescence”. When too much ink is applied, the ink runs together, creating bigger-looking dots. (Gloss optimizer will also slightly increase the apparent graininess). So, if your image has lots of even tones, you might want to use the “less ink” setting. With saturated colors, perhaps the “more ink” setting. I’m still doing testing on all this, and will be curious to hear what other Z3100 users discover.
Charles Cramer, April 2008
________________________________________________________________
Charles Cramer invites you to see his new, completely redesigned website at www.charlescramer.com.
Charlie and Bill Atkinson offer their workshop
“Digital Printing for the Fine Art Photographer”
five times a year.
See Charlie’s website for all the details.
________________________________________________________________
Downloads
Please Note:
These files are only of use if you own an HP Z3100 printer and the HP APS software.
The following files may be downloaded here.
Pages 1 and 2 of the 918 patch target reconfigured to fit 13×19 paper
Pages 1 and 2 of the 918 patch target reconfigured to fit 13×19 paper
100 Patch test target for testing media settings on 11×17 paper
Text file for above (to be placed in the APS application as described in the article)
Michael Reichmann is the founder of the Luminous Landscape. Michael passed away in May 2016. Since its inception in 1999 LuLa has become the world's largest site devoted to the art, craft, and technology of photography. Each month more than one million people from every country on the globe visit LuLa.
You May Also Enjoy...
Michaels Antarctica 2014
Pleaneau Bay, Antarctica – February, 2014Whenever people ask me what being in Antarctica is like, I tell them that it is as close to visiting
